dom lizarraga
I read The Minitest Cookbook by Chris Kottom on January 5, 2022
Review
Today though, the separation between development and testing has largely disappeared - at least in the universe that most Ruby and Rails programmers occupy.
In many if not most cases now, the one writing the code is also responsible for producing automated tests that cover the work done. And while you’re probably sick of hearing it, this is a good thing for all kinds of reasons. Why?
• Tests demonstrate that your code actually works. • The pattern of thinking needed to write tests for code is very close to that needed to design it. • Testing and developing in parallel tends to surface more bugs early in the development process when fixing them is cheap and easy. • Well-tested code tends to be better designed with reduced coupling and greater cohesion. • A good test suite acts as a detailed specification. • Writing tests during development increases programmer engagement and efficiency. • A test suite with good coverage aids in maintenance, refactoring, and upgrades with reduced risk of breakage and regression. • It’s faster to write code with tests than without. • Having automated tests reduces or removes the need for manual testing
Best tests will have a few important characteristics in common: • Clarity: The name of each test suggests what it’s about at a glance. • Purpose: The intent and meaning of the test is obvious and unambiguous from the testing logic. • Eloquence: The test logic is expressed through fluent use of the language and the testing framework. • Readability: Tests are written and formatted in a way that promotes rapid discovery and comprehension. • Efficiency: All other things being equal, automated tests should use the minimum possible system resources
Unlike a lot of books on testing, this one won’t dwell on the mechanics of test-driven development. TDD has become so prevalent and popular among the Ruby and Rails development community that you’d be hard pressed to find a book on testing or development that doesn’t take it as a starting point for everything taught. But TDD is primarily about development and only incidentally about testing, and it often treats the tests that fall out of it as a by-product rather than as first-class citizens of your project. That tends to result in test suites that are neglected after they’ve served the purpose of driving out features.
• Fact: The entire framework weighs in at less than 1600 lines of code. RSpec is almost 8 times as large. With a code base that size, the source practically becomes its own documentation. • Fact: Minitest has been singled out as a very readable project because it’s written in plain Ruby that developers of all experience levels can dig into and understand. • Fact: The project has remained small and simple because of conscious decisions to keep it that way in spite of frequent requests for expanded features. • Fact: The source code showcases Ruby’s power and elegance with great uses of closures, metaprogramming, concurrent programming, and others. • Fact: Since the Minitest framework also happens to be tested with Minitest, it includes some exceptional practical examples illustrating good testing technique
To really get comfortable with Minitest’s internals, there are four basic abstractions that you’ll need to understand: plugins, reporters, runnables and the Minitest runner.
Plugins
In Minitest, plugins are modules that extend or modify the behavior of Minitest. They can be used to add new features, customize the test runner, or modify the output of test results. Examples of plugins in Minitest include pride (a colorful test runner), parallel (for parallel test execution), and focus (to run specific tests or test suites).
Minitest plugins are usually packaged as RubyGems which implement a simple framework-defined contract that allows them to be loaded an initialized by the framework. Specifically speaking, every plugin includes a loader file that follows a standard naming convention - ex: minitest/ foo_plugin.rb where foo is the name of the plugin.
minitest-rails is a plugin for Minitest that adds some additional features for working with Ruby on Rails applications. It provides some additional test generators that can create test files for your Rails application’s models, controllers, views, and helpers. It also includes support for testing Rails-specific features like routes and controllers.
In addition to the generators, minitest-rails also provides a Rails-specific test runner that sets up the Rails environment before running the tests. This can be helpful if your tests need to access Rails configuration or other Rails-specific features.
Overall, minitest-rails is a helpful plugin for anyone working with Ruby on Rails applications and using Minitest as their testing framework.
Another example: the minitest/pride plugin adds colorful output to your test results in the terminal.
Reporters
A test suite is a map for directing development effort to the parts of your project that need it. From this perspective, the results reported by your test suite act as its user interface and indicate the state of your code base.
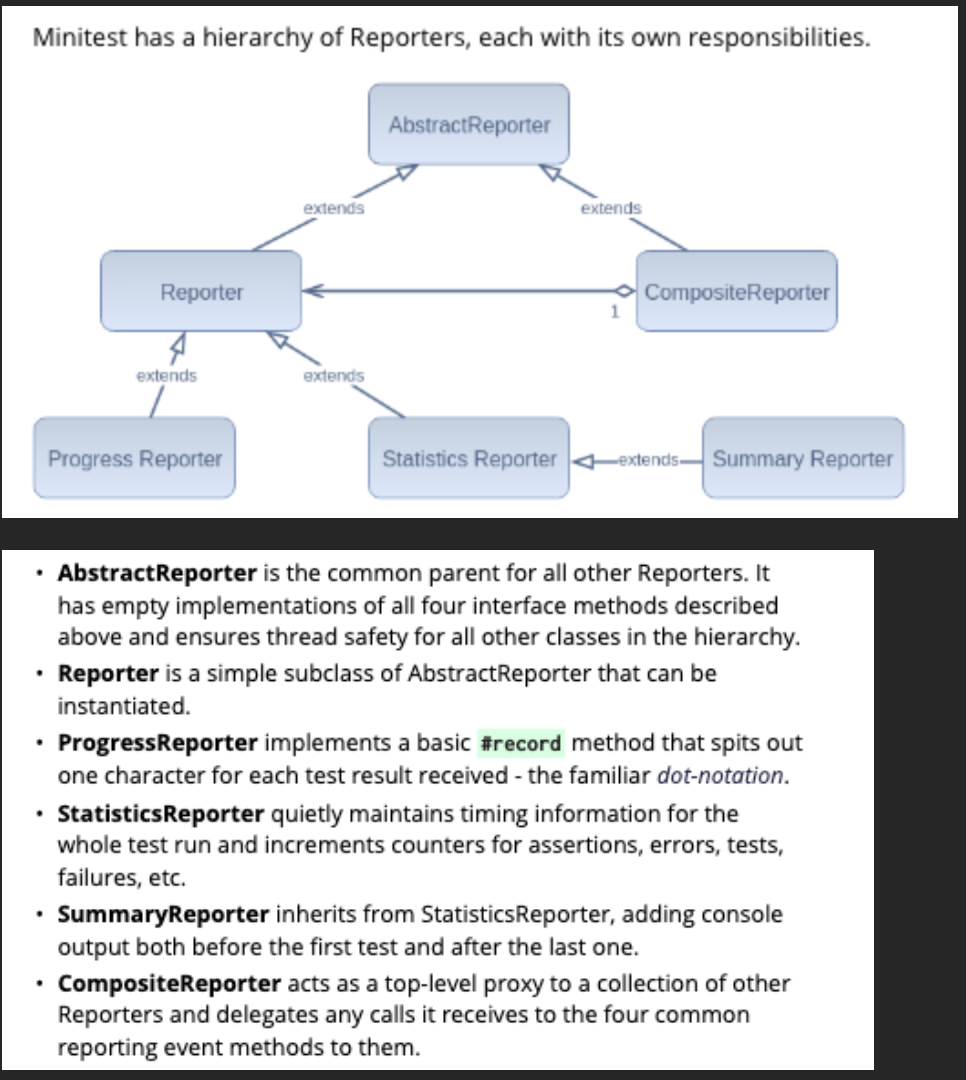
Each test Minitest runs passes a result to a Reporter object which is responsible for acting on it. Depending on the Reporter, it might: • Display information to the console. • Store the result for later processing. • Increment counters or compile statistics. • Send the result to another system - ex: a CI, a database, etc.
As an abstraction, a Reporter is just an object that implements four methods that allow it to accept and operate on test results: • #start - called before the first test is run • #record - accept and process a single test result • #report - deliver a detailed report after the test run • #passed? - indicate passed/failed/errored/skipped tests
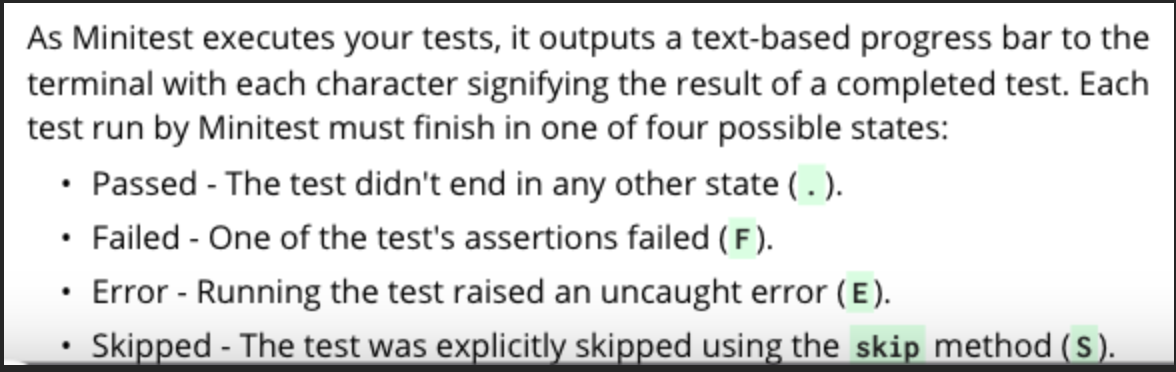
In Minitest, reporters are used to generate output of the test results. They provide various types of outputs such as progress bar, detailed documentation, and colorized output.
Runnables
In Minitest, runners are classes that run a set of tests.
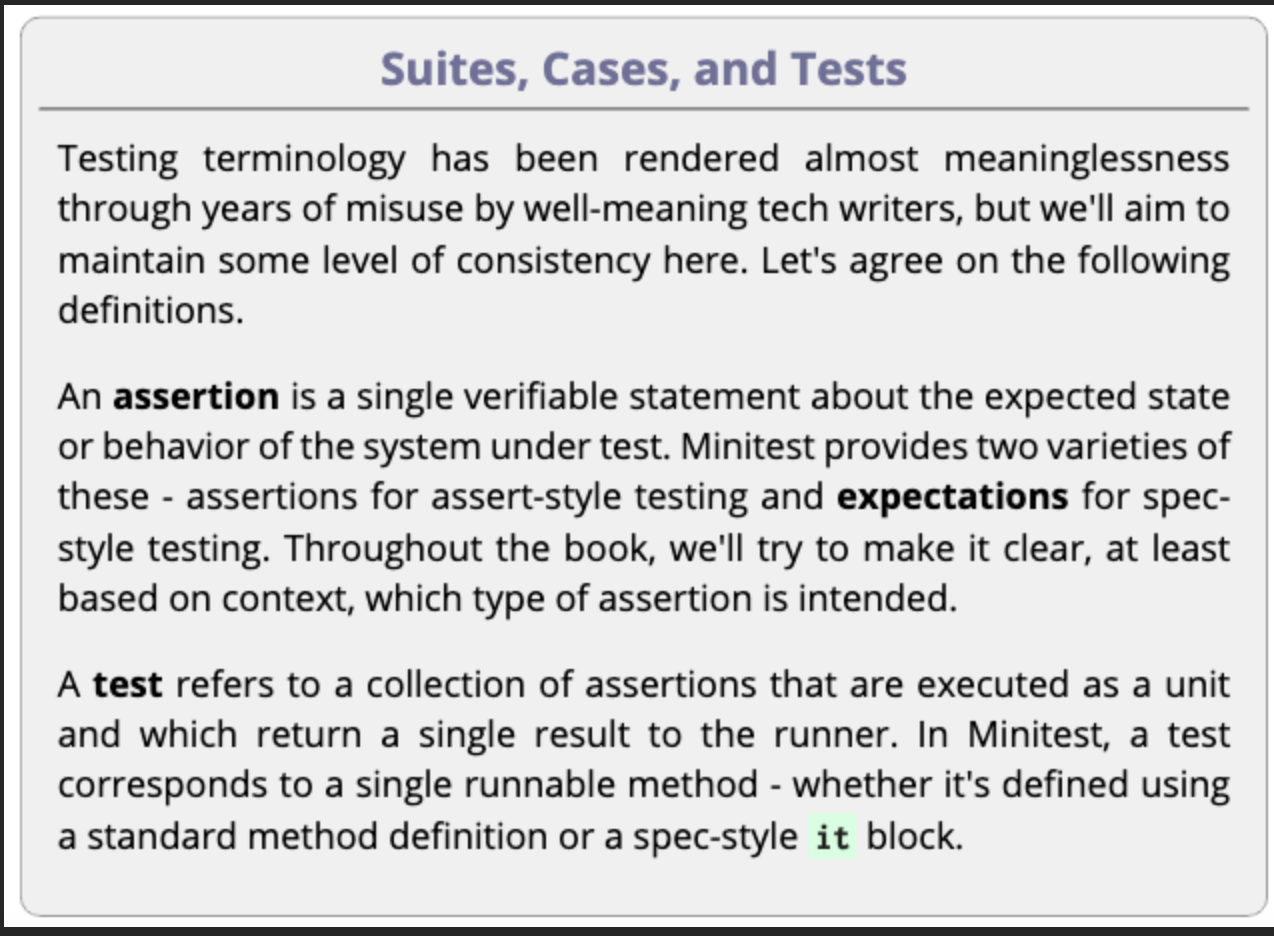
Assert-style tests and Spec-style tests are two different styles of writing tests in Minitest.
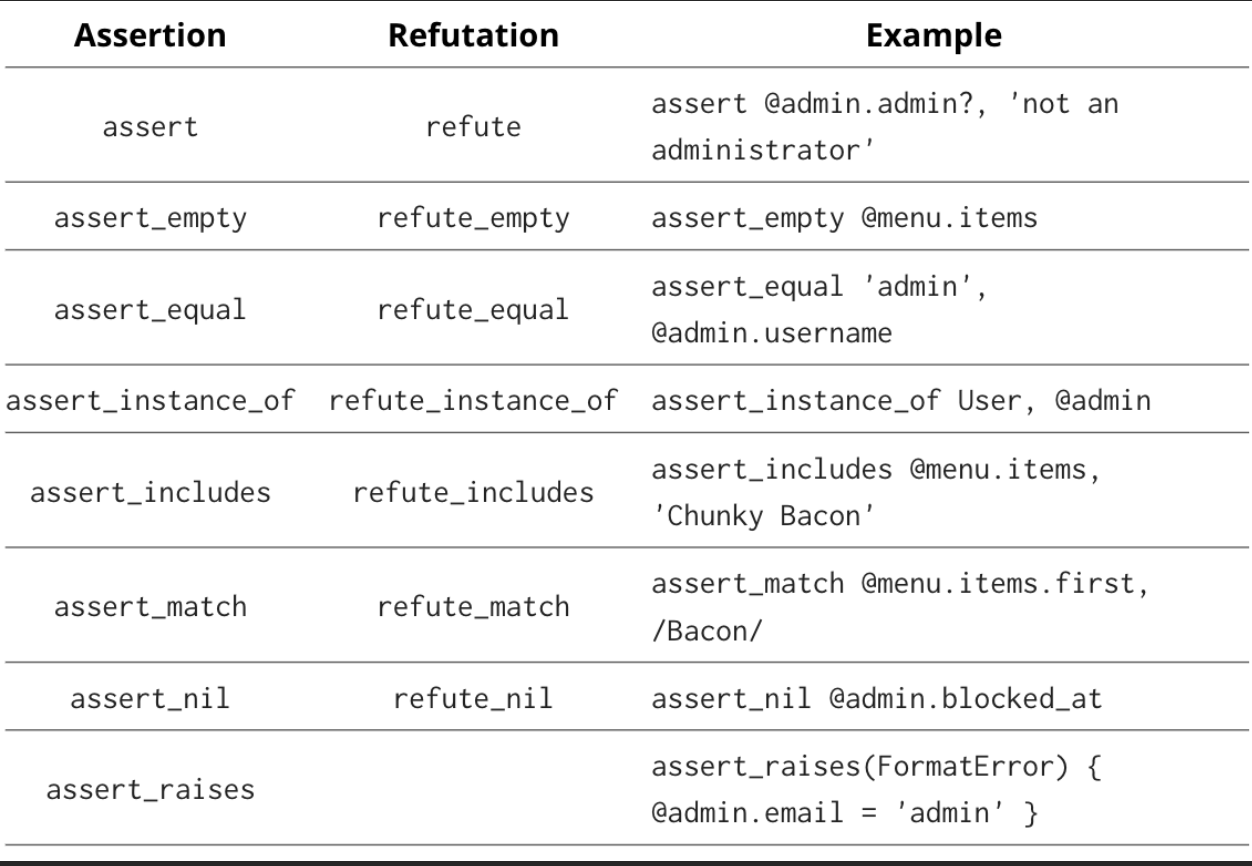
Assert-style tests are based on assertions that verify the expected result of a test. They are usually written using methods such as assert, assert_equal, assert_match, etc. The focus is on verifying specific outcomes and behavior of the code being tested.
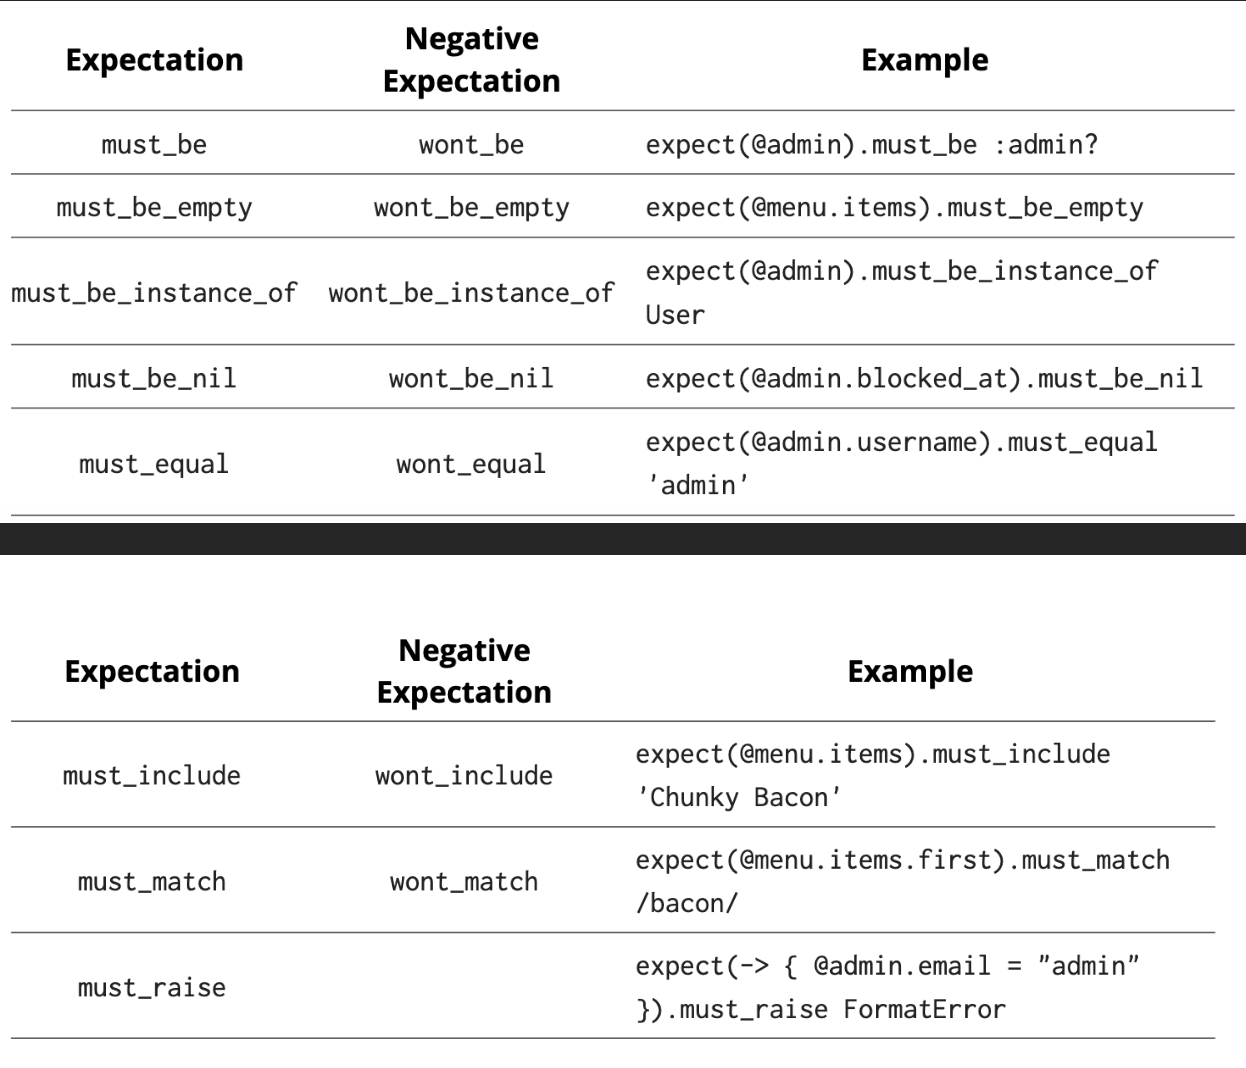
Spec-style tests are based on specifying the expected behavior of a system or component. They are usually written using describe and it blocks that describe the behavior of the code being tested. The focus is on describing the behavior and intent of the code, rather than just verifying specific outcomes.
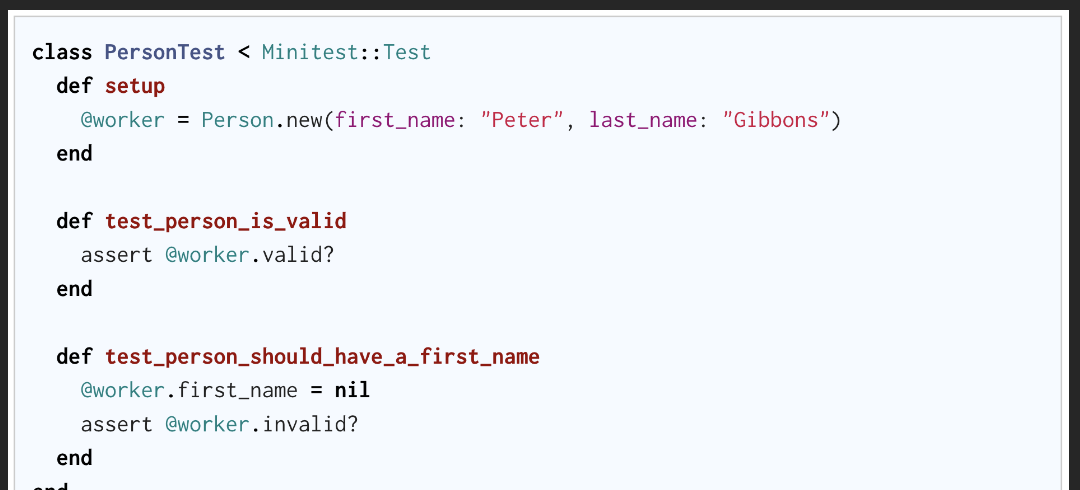
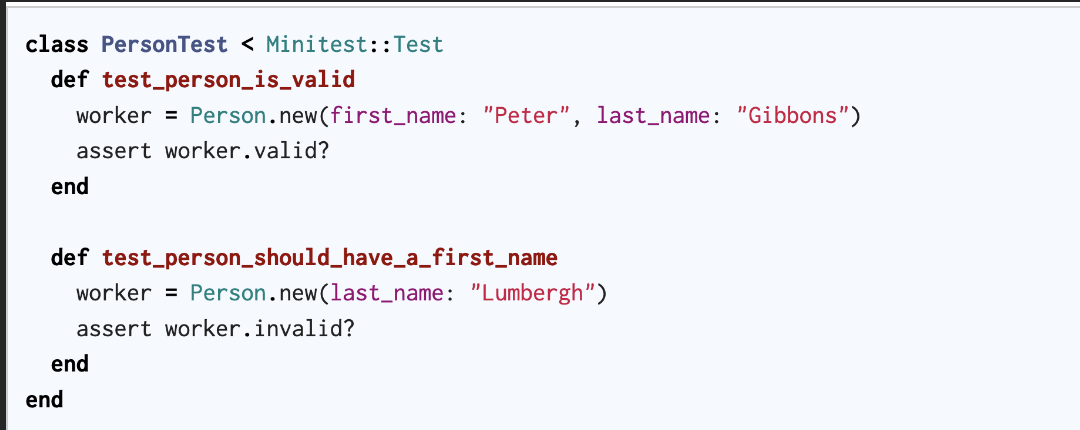
Assert-style tests are based on the idea of making assertions about the state of the system under test. These tests usually follow the “Arrange-Act-Assert” pattern, where the test sets up the system’s initial state, performs some action, and then makes one or more assertions about the system’s final state. (This uses instance methods starting with the string “test_”).
Spec-style tests, on the other hand, are based on the idea of describing the behavior of the system under test using a domain-specific language (DSL). In these tests, the focus is on describing what the system should do rather than how it should do it. Spec-style tests often use “describe” and “it” blocks to structure the test code.
Both styles of testing have their pros and cons, and the choice of which one to use often comes down to personal preference and the requirements of the project. Some developers prefer the clarity and simplicity of Assert-style tests, while others find the expressiveness and readability of Spec-style tests to be more appealing. Ultimately, the most important thing is to choose a style that works for you and your team and allows you to write effective, maintainable tests.
The Minitest Runner
The Minitest Runner is the component responsible for running Minitest test suites. It loads the test files, executes the tests, and reports the results. By default, Minitest uses the Minitest::Runnable and Minitest::Test classes to define and run tests, respectively. However, the runner can be customized to use other classes or to change the way the tests are run. The runner is a key part of Minitest’s flexibility and extensibility.
The runner and Runnables fit together like the layers of an onion where each layer represents a Ruby block or method. The inner layers represent the Runnables where the tests are actually executed, and the outer layers represent the runner - the code that gives the onion its shape.
Minitest.run Next, Minitest sets up the environment for the test run along with all the necessary supporting objects. All the framework’s major responsibilities are handled right here as it: • Parses the command line arguments. • Loads and initializes all detected Minitest plugins. • Instantiates and runs the reporters. • Runs tests by passing control on to the next layer. • Ensures that parallel worker threads are shut down gracefully.
Basic Recipes
Problem:
class FizzBuzz
	def convert(number)
		if number % 15 == 0
			"FizzBuzz"
		elsif number % 5 == 0
			"Buzz"
		elsif number % 3 == 0
			"Fizz"
		else
		number.to_s
		end
	end
end
Takeaways
You need four things to develop a Ruby project with Minitest:
• Install Minitest as a project dependency with Bundler.
• Create a test directory at test/ .
• Create a test helper to include all global configuration and customization at test/test_helper.rb .
• Create a new Rakefile or update the existing one with a Rake::TestTask configured to suit your needs (by convention to run tests you use the command rake)
Writing Tests
All the tests that we write follow the same basic four-phase structure. 1. Setup the inputs and data objects prior to running the test. 2. Exercise the logic under test. 3. Verify that the tested code produces the expected results. 4. Teardown or reset application state before running the next test.
require 'test_helper'
require 'fizz_buzz'

class FizzBuzzTest < Minitest::Test
	def setup
		@fb = FizzBuzz.new
	end
	def test_converts_multiples_of_fifteen_to_fizzbuzz
		# fb = FizzBuzz.new
		assert_equal 'FizzBuzz', @fb.convert(15)
		assert_equal 'FizzBuzz', @fb.convert(45)
		assert_equal 'FizzBuzz', @fb.convert(90)
		[15, 45, 90].each do |i|
			assert_equal 'FizzBuzz', @fb.convert(i)
		end
	end
	def test_converts_multiples_of_five_to_buzz
		# fb = FizzBuzz.new
		assert_equal 'Buzz', @fb.convert(5)
		assert_equal 'Buzz', @fb.convert(10)
		assert_equal 'Buzz', 2fb.convert(20)
	end
	def test_converts_multiples_of_three_to_fizz
		# fb = FizzBuzz.new
		assert_equal 'Fizz', @fb.convert(3)
		assert_equal 'Fizz', @fb.convert(12)
		assert_equal 'Fizz', @fb.convert(48)
		# another example could have been assert 'Fizz' == fb.convert(3)
	end
	def test_returns_same_number_for_other_numbers
		assert_equal '1', @fb.convert(1)
		assert_equal '101', @fb.convert(101)
		assert_equal '2014', @fb.convert(2014)
	end
end
Another example of syntaxis:
class ArticleTest < ActiveSupport::TestCase
	test "should not save article without title" do
		article = Article.new
		assert_not article.save
	end
end
That’s why many developers follow a strict one assertion per test policy - so that each assertion has exactly one chance to succeed or fail. It’s true that your tests will be better and more maintainable when each test verifies a single behavior of the system, but writing a single test for each of the assertions above seems like overkill to me since they’re all testing the same general behavior.
setup runs before each test. teardown runs after each test.
It’s better to favor readability over DRY-ness when writing tests.
Usage of skip
Skip can be useful in situations where you want to write a test that specs out some future work that you’re not quite ready to code just yet. For example, FizzBuzzTest doesn’t currently check to see what happens when we pass it an unexpected input.
def test_raises_argument_error_for_bad_argument
	skip 'not yet implemented'
	assert_raises(ArgumentError) { @fb.convert(-1) }
	assert_raises(ArgumentError) { @fb.convert(0) }
	assert_raises(ArgumentError) { @fb.convert(1.0) }
	assert_raises(ArgumentError) { @fb.convert('foo') }
	assert_raises(ArgumentError) { @fb.convert(nil) }
end
Takeaways • Assert-style test cases are classes that inherit from Minitest::Test. • Public instance methods of those classes whose names begin with test_ are treated as tests by the runner. • Minitest provides a small set of assertions out of the box, and of those, about half are used frequently. • Override the setup and teardown methods to include code that should be executed before or, respectively, after each test is executed. • If you have to choose between readability and DRY-ness in your tests, you should almost always choose readability.
Writing Specs
class FizzBuzzIterator
	def initialize(start = 1)
		@counter = start
		@fb = FizzBuzz.new
	end
	def next
		input = @counter
		@counter += 1
		@fb.convert(input)
	end
end
require 'test_helper'
require 'fizz_buzz_iterator'

describe FizzBuzzIterator do
	it 'outputs sequential FizzBuzz values starting from 1 when initialized without a starting value' do
		iterator = FizzBuzzIterator.new

		expect(iterator.next).must_equal '1'
		expect(iterator.next).must_equal '2'
		expect(iterator.next).must_equal 'Fizz'
		expect(iterator.next).must_equal '4'
		expect(iterator.next).must_equal 'Buzz'
		expect(iterator.next).must_equal 'Fizz'
	end
	it 'outputs sequential FizzBuzz values starting from the starting value when initialized with a starting value' do
		iterator = FizzBuzzIterator.new(10)

		expect(iterator.next).must_equal 'Buzz'
		expect(iterator.next).must_equal '11'
		expect(iterator.next).must_equal 'Fizz'
		expect(iterator.next).must_equal '13'
		expect(iterator.next).must_equal '14'
		expect(iterator.next).must_equal 'FizzBuzz'
	end
end

# Other alternatives

expect(iterator.next).must_equal 'Fizz'
value(iteratory.next).must_equal '11'
_(iterator.next).must_equal 'Buzz'
Assertion vs Expectation
Like most powerful tools, this one can be abused. As a general rule, try to limit describe block nesting to at most two or three layers deep. More than that and the specs hard to follow and less readable for future developers (including future you).
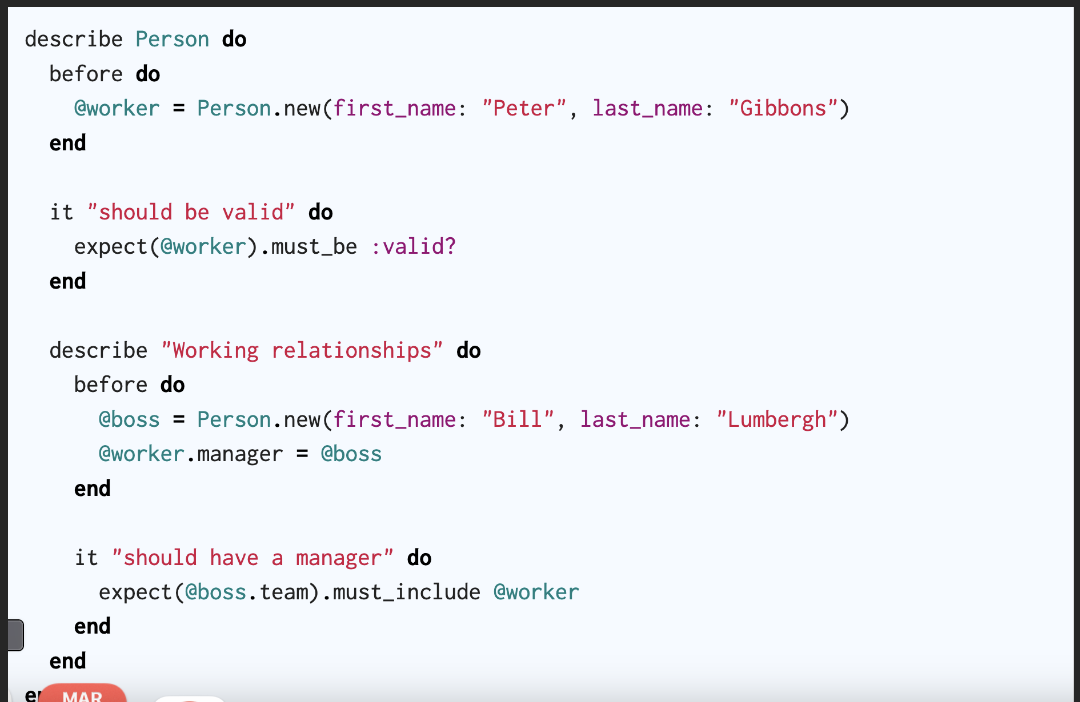
Before and After for Spec-Style
before blocks for all enclosing scopes will be called before the test logic in order from outermost to innermost.
after blocks for all enclosing scopes will be called after the test logic in order from innermost to outermost.
In practical terms, this lets us define blocks with increasingly specific setup and teardown logic that cascade or override previous operations
require 'test_helper'
require 'fizz_buzz_iterator'

describe FizzBuzzIterator do
	before do
		@iterator = FizzBuzzIterator.new
	end

	it 'outputs sequential FizzBuzz values starting from 1' do
		expect(@iterator.next).must_equal '1'
		expect(@iterator.next).must_equal '2'
		expect(@iterator.next).must_equal 'Fizz'
		expect(@iterator.next).must_equal '4'
		expect(@iterator.next).must_equal 'Buzz'
		expect(@iterator.next).must_equal 'Fizz'
	end

	describe 'when initialized with a starting value' do
		before do
			@iterator = FizzBuzzIterator.new(10)
		end
		it 'outputs sequential FizzBuzz values starting from the starting value' do
			expect(@iterator.next).must_equal 'Buzz'
			expect(@iterator.next).must_equal '11'
			expect(@iterator.next).must_equal 'Fizz'
			expect(@iterator.next).must_equal '13'
			expect(@iterator.next).must_equal '14'
			expect(@iterator.next).must_equal 'FizzBuzz'
		end
	end
end
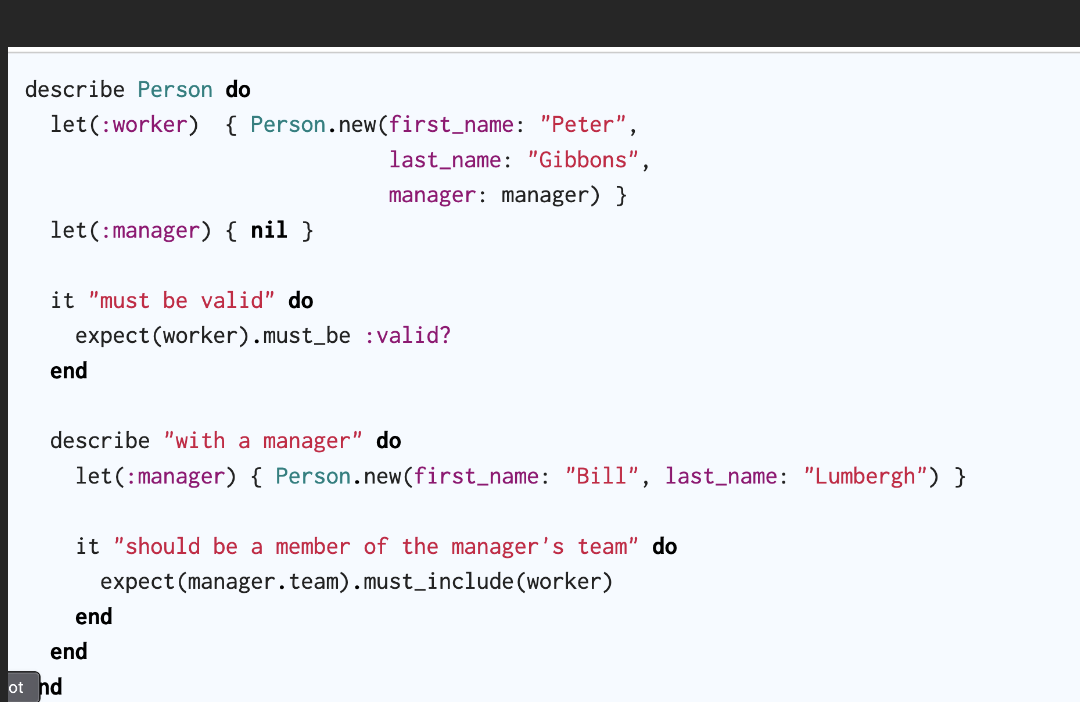
The let function provides an alternate and some would say more elegant way of setting up testing state with a more declarative syntax.
describe FizzBuzzIterator do
	let(:iterator) { FizzBuzzIterator.new }
	# ...
end

describe FizzBuzzIterator do
	let(:iterator) { FizzBuzzIterator.new(10) }
	# ...
end
Each call to let dynamically defines a new method with the specified name that executes the block argument upon the first invocation and caches the result for later access - in other words, a lazy initializer.
Takeaways
• Create a new test case in Minitest::Spec using a top-level describe block with a String or Class argument.
• Define a test using an it block with a descriptive String passed as a parameter.
• Make assertions on the values of expressions by wrapping them in a Minitest::Expectation object using expect or one of its aliases.
• Use nested describe blocks to define scopes within a test case as a way of grouping related tests.
• Implement before and after blocks for shared setup and teardown logic specific to a block context.
• Create named lazy initializers using let blocks.
Configure Pre-Test State
As explained back in Writing Tests, each test run under Minitest follows a common progression of steps: Setup, Exercise, Verify, and Teardown. Of these, Setup usually accounts for more lines of code and can be the toughest for new developers to understand. There are several options for setting the state, and knowing which one is the best fit requires familiarity with all of them.
Method 1: Set up the same state before each test.
Method 2: Configure different state before each test.
Method 3: Using a memoized helper method.
Method 4: Create data objects within the test.
Collections
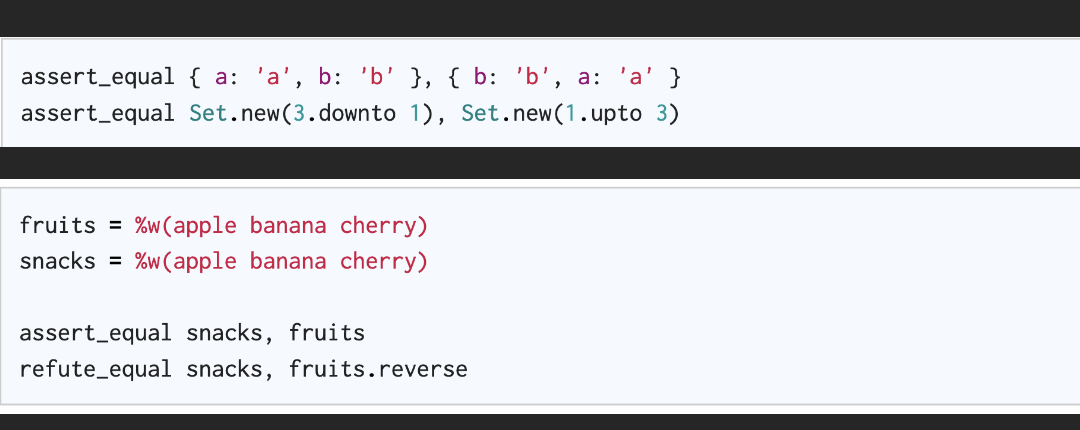
Enumerable types where order doesn’t matter like Hash and Set count two instances as being equal if they contain the same elements regardless of the order in which the elements were added or passed during initialization.
Relations (active record)
Just as with Arrays though, order matters, so you’ll need to ensure that both the actual and the expected values are sorted the same way when performing comparisons.

ActiveRecord::Relation objects compare mostly like Arrays except when compared with others of the same type, and then according to the SQL representation.

Dates and Times

Intermediate Recipes
Mocks: mocks test the behavior of an object toward the objects to which it sends messages.
Use mocks sparingly and only after careful consideration. The more collaborators you mock, the greater your risk of false positives.
• Only mock what you own. If you don’t own it, the API could change, and you’d never detect it in your tests. • Only mock immediate collaborators and avoid deep mocking (mocks returning mocks returning mocks). • Ideally, only use mocks to solve specific difficult problems like: ◦ Connecting to unreliable or uncontrollable external resources ◦ Real object performance is prohibitively slow ◦ Expensive setup and/or configuration ◦ Avoiding other undesirable side effects
Stubs Stubs provide the context needed to fully exercise an object through a given test scenario
• Use stubs wherever and whenever they’re needed, but recognize that needing too many is probably a code smell. • Don’t use stubs where they’re not needed, and apply them as narrowly as possible where you do use them. (See Mocha’s stub_everything and any_instance.stub as prime examples of mocking framework features promoting bad coding practices.) • Never ever, ever stub the object under test. More often than not, you’ll end up testing the stub and not the object itself.
Fake Objects
A fake is an alternate version of a given class intended for testing only. It exposes an interface resembling that of the real thing it replaces but with an implementation that’s either simplified or hollowed out which allows them to: • Capture and verify interactions between the object under test and the fake object (like a mock). • Maintain consistent interactions between the object under test and the fake object (like a stub). • Avoid resource-intensive or otherwise undesirable processing (like both mocks and stubs).
We could have gotten the same result using mocking or stubbing, but it might have taken many more lines of setup code. A fake can be a great fit when dealing with complex APIs since it comes ready-made and pre-programmed with the behavior we want and need for running our tests.
Testing Mixin Behavior
Testing something that can’t be instantiated on its own confuses many developers.
two types of mixins:
Those that are coupled with the classes that include them, and those that aren’t (non-coupled modules)
Takeaways
• Use Object#extend to patch a mixin’s method into a simple Object for easy testing. • Try mixing into a Ruby Struct in cases where you need the including class to have some specific attributes or behavior of its own.
Sharing Code Between Tests
One point that should be clear to you by now is this: a self-contained test is a readable test. Minitest provides a nice, narrow vocabulary for writing tests, and when we stick to that vocabulary, life becomes better for the developers that follow.
When it comes to organizing tests: • Extracting code into a new helper methods • Extracting helper methods into a new module • Extracting tests into a new module
Extracting helper methods by: • Using descriptive names for helper methods and variable arguments • Updating the extracted code to ensure that it’s still comprehensible, even outside the previous context
Takeaways
• Code shared within a single test case can be extracted to a private helper method in the same class. • Code shared across multiple test cases can be extracted to a module that may be included in all. ◦ Sharing tests between test cases is a special case of this
Managing Test Data
• Whenever persistence isn’t important to your test, use Object.new to create a new instance. • Rails fixtures have a lot going for them including great performance and a reliable set of known models for your tests. • Use both functional and memorable names for your fixtures. • Configure your fixtures carefully, and try to cover at least: ◦ One minimal valid configuration ◦ One or two realistic models ◦ Other well-defined object states • Use advanced ERB and YAML features to define fixtures dynamically.
Testing Active Record Models
Active Record maps the application database to Ruby objects that manage attributes, relationships, queries, and lifecycle methods among other things.
• Test public methods, not private ones. • Test interfaces, not implementations. • Don’t test Active Record (or the rest of Rails, for that matter). • You need to test some of the typical aspects of Active Record models: ◦ Complex validations ◦ Scopes ◦ Callback targets and hooks • Make assertions about the results and side effects of public instance methods. • Make (selective) assertions an object’s behavior toward collaborators.
Testing Controllers
There’s been a faction of the Rails community that has become vocal about skipping controller testing completely. They usually argue that simulating more realistic user interactions eliminates the need for more focused controller tests which tend to be very repetitive and dull to write anyway. Even the core team has started a gradual move away from controller testing.
◦ Controller tests should include assertions for the visible side effects that controller actions produce including: ◦ HTTP response code ◦ Redirect location ◦ System state changes (models created, updated, or destroyed) ◦ Flash variables, session variables, and cookies set or changed • You should write tests for complex or generated routes. • Controllers should specifically not make assertions about any of the following: ◦ Rendered templates ◦ Instance variables passed to the view
Details
- The Minitest Cookbook by Chris Kottom
- Published: 2012